


Introduction & prerequisites
This post is going to be about commits with a "verified" badge in Git. So, naturally, we would assume, you have basic knowledge of basic git operations like git clone, git commit, git push, git pull.
git authors vs commiters
When a user pushes the commit to the remote repo on GitHub, GitLab, or BitBucket. We can see the commit author on the respective web app. But, there is a but. If you try committing to a new project on a new machine, you would know, that first of all, before doing the first commit, you have to config a username and user email, which tells git about the commit commiters. So, you run git config user.name "<your_name>" and git config user.email <your_email> and config them, then only git allows you to do your commit. if you are not asked for it, it means you possibly have run git config globally with --config flag earlier at some point.
git authors are the same as your committers in usual cases, but they can be overridden while writing a git commit command like git commit -m "<commit_message> --author <Mohit mohit.chavda1997@gmail.com>" . and it will override the git config details ( of username and EMAIL-ID).
The Problem with commit authors
The problem with commit authors (and also committers), is, they are trust-based. It means you can write anybody's username and email-id and git will accept it, trusting you, that you have written the right name.
You might ask, a.) the person whose email I have put, might not be even authenticated to do the commit, and they might not even have rights to perform any git operation b.) you might have SSH key in place for yourself that can identify your identity of you to git OR have HTTPSbased auth, which will again give the identity of you to git. why do we have git config user.email , user.name , git commit --author in place?
The answer is very simple, the GIT doesn't check the auth of which user this commit is coming from or the user configured in git config is allowed to do a git commit, and even when you do git push the git will only check whether you are authenticated to perform the operations on the repo or not, but it will not check, whether the commits which are being pushed, were authored by the same users or not.
This is not something to be worried about in small-scale startups or personal projects. But, sometimes, it is very important to know the exact author of the commit on which we can rely upon. And as always, there is a way.
The Solution - GIT COMMIT SIGNING
So, commit signing is a way, which tells you about the right author of a commit in a properly authenticated way. So, without wasting your time, we will jump into how to do commit signing in git.
How to sign your git commits
(If you have idea about SSH auth with git, this will be very easy to understand and setup)
Before jumping, we need to make sure, you guys have gnupg installed.
Windows -> If you do NOT have git bash installed, then only Click here to download it. (While installing, Uncheck on additional components like Kleopatra, GPA and every other option, as we won't be needing them). If you have git bash, then you are good.
Ubuntu -> sudo apt install gnupg
MacOS -> brew install gnupg
Now, that you have installed it.
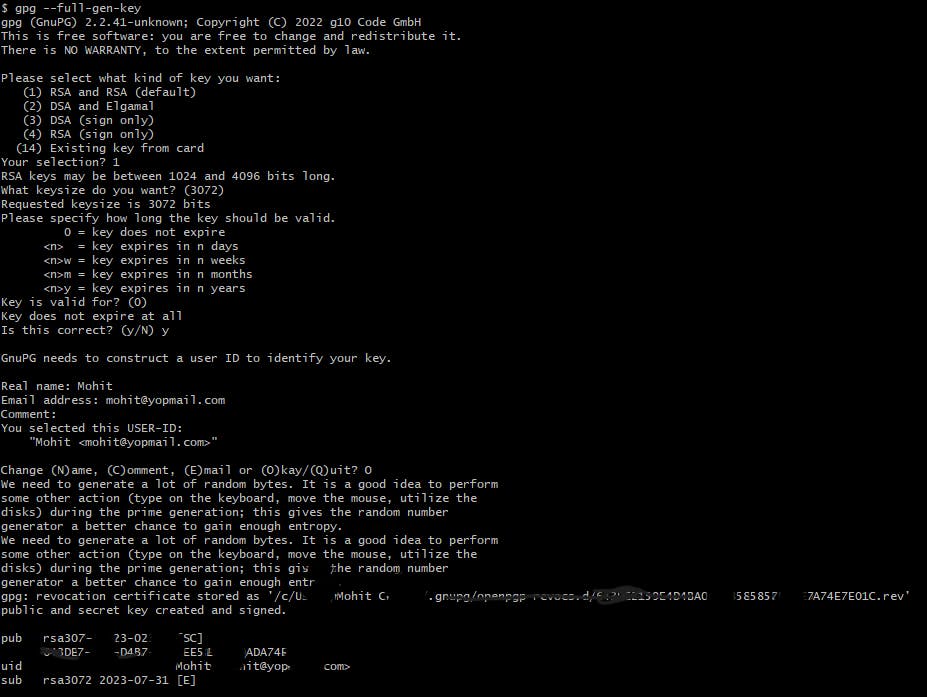
run
gpg --full-gen-keyin your respective OS terminal/git bash, to generate RSA key pair.The command will ask for diff. options, and I would suggest going with the default options.
Now, that you have generated pair of keys which is public and private (just like SSH). The private key will lie in your machine and the public key will go to your git accounts. Yes, accounts, because, unlike SSH, you can put 1 gpg public key into your multiple git accounts which might be on different git providers.
List down your gpg keys by writing
gpg --list-keys
you should get output like below.

Copy the public key from the above output to your clipboard and also keep it handy as we will need them in the next steps. Remember it will just be alphanumerical without spaces and enters. so, don't copy anything else but just the key, and run the below command.
 gpg --export --armor <alphanumerical_private_key> > ./gpg-key.pub
 ## dont forget to put '>' after the key as above
this is copying your key to a file named gpg-key.pub. The --armor is indicating to export of the key into ASCII armored format.
- Now, the content of this file (and NOT just the
<alphanumerical_private_key>)gpg-key.pubshould be pasted as is, on github.com by going to settings > SSH and GPG keys > New GPG key. on gitlab.com you can got to prefrences > GPG Keys.
The content of your file will start with -----BEGIN PGP PUBLIC KEY BLOCK----- and after sevaral lines of public keys, will end with -----END PGP PUBLIC KEY BLOCK-----
- So, now that you have pasted it on your respective git provider. You still need to enable the commit signing on your machine
git config --global commit.gpgsign true
and then,
git config --global user.signingkey <alphanumerical_private_key>
Now, the commits done from this system will be considered signed and authenticated by name and email we used while creating this key. You will know this by seeing a "Verified" badge against each commit like this.

Happy signing your commits! See you in the next one.